Belt Sander Comparison: DIY Picks for 2026
Explore a comprehensive belt sander comparison for 2026, evaluating power, belt width, dust control, weight, and value. This guide helps homeowners and DIY enthusiasts choose the right belt sander for floors, decks, and walls with practical tips and clear side-by-side analysis.

Choosing a belt sander comes down to power, belt width, dust control, and user comfort. In this belt sander comparison, SanderSavvy finds Model Alpha to offer the best overall balance for most DIY projects, Model Bravo for aggressive material removal, and Model Charlie as a versatile mid-ground. Read on for an in-depth breakdown.
Belt Sander Basics and What This Belt Sander Comparison Covers
Belt sanders are power tools designed for fast material removal on flat surfaces. The belt, a continuous loop of abrasive material, spins at high speed and can aggressively remove stock if not controlled. In this belt sander comparison, we examine three representative models—Alpha, Bravo, and Charlie—to illustrate how power, belt width, speed, dust control, weight, and ergonomics interact to produce different results on wood floors, decks, and wall surfaces. For homeowners and DIY enthusiasts, the goal is to achieve smooth, even finishes without gouging or creating swirl marks. To keep projects moving, you’ll want a sander that tracks well, feels balanced in the hand, and works with a compatible dust extraction setup. This article uses practical tests, typical project scenarios, and value-focused evaluation to help you choose the right belt sander for your tasks. Across the board, the key factors are consistency of sanding, control near edges, and how easily the tool integrates with your shop workflow.
According to SanderSavvy, start by identifying your most common projects and the surfaces you’ll encounter: floors, decks, and walls. If you routinely deal with large flat surfaces, prioritize power and belt stability. If you often work in tight corners or near moldings, ergonomics and low vibration become decisive. The belt sander comparison that follows looks at three representative models rather than a single “best” option, because the right pick depends on your project mix and budget. In short, this article translates specs into practical outcomes you can feel in your workshop.
Finally, remember that belt sander performance is only as good as your technique. Maintain even pressure, avoid leaning on the sander, keep the belt aligned, and periodically check belt wear. With that baseline, you can interpret the data in the comparison table and draw a confident conclusion about which sander best suits your needs.
Key Differentiators in Belt Sanders (Power, Sanding Belt, and Feedback)
When you evaluate belt sanders, three core differentiators dominate the conversation: power and torque, sanding belt construction and width, and user feedback in real-world scenarios. Model Alpha emphasizes higher wattage and robust belt tracking, which translates to faster stock removal on large flat surfaces like floors and wide decks. Model Bravo trades some peak power for lighter weight and a punchier speed range, making it ideal for aggressive material removal on dense woods or finishing tasks that require more aggressive shaping without sacrificing control. Model Charlie sits in the middle, with balanced power and a broad speed range that favors versatility—sufficient for both rough stock removal and more refined finishing.
Power and torque determine how quickly you remove material, but too much power with a heavy tool can lead to gouges if technique lags. Belt width, typically 3 inches on common models, dictates contact area and heat buildup; wider belts remove more quickly but demand steadier handling. Speed control, when present, helps you adapt to softwoods (lower speeds) or hard hardwoods (higher speeds) without overheating. The ergonomics of each model—grip angle, vibration dampening, and weight distribution—shape the day-to-day experience and the quality of your finish. Dust collection capabilities, mounting options to vacuums, and noise levels contribute to the overall usability, especially for indoors projects where air quality and noise matter. The conclusion is that the “best” sander depends on how you balance these factors against your typical workload and workspace constraints.
From a practical standpoint, you should map your typical task load against the model profiles. If you often work alone for long sessions, Alpha’s sustained power with stable tracking can minimize fatigue. If you frequently tackle stubborn stock or outdoor decks, Bravo’s speed range can accelerate completion. If you require a generalist tool that handles both rough material and finishing chores without frequent belt swaps, Charlie provides a reliable middle path. The most important decision is to align your purchase with your most common tasks, including surface flatness, the presence of edges or corners, and your tolerance for belt changes and maintenance.
Sanding Belt Types and Their Impacts on Finish
Not all sanding belts are created equal, and the belt material—whether aluminum oxide, ceramic, or silicon carbide—shapes finish quality, wear resistance, and dust generation. Aluminum oxide belts are common and provide a good balance of cost and performance for softwoods and most hardwoods. Ceramic belts offer longer life and sharper cut for heavy stock removal and dense woods, but at a higher price point. For aggressive initial stock removal on floors and large surfaces, ceramic belts can maintain consistent aggressiveness longer than standard aluminums, reducing downtime for belt changes.
In this belt sander comparison, those choices interact with belt width and speed. A 3-inch belt is standard for most DIY sanders and provides predictable heat dissipation on flat surfaces. Wider or variable-width belts permit faster removal but demand careful handling to avoid gouging at edges. Finishing belts with finer grits will help reduce scratch patterns, while coarse grits expedite material removal but require a careful subsequent finish pass. Dust performance also depends on belt material; some belts shed more abrasive dust at high speeds, which can clog bags and filters more quickly. A practical rule: match belt type to the job’s material and finish requirements, then use the appropriate sanding sequence (rough, intermediate, finish) to achieve a smooth, uniform surface.
Understanding belt types helps you interpret the data in the comparison metrics and choose a belt that aligns with your typical tasks. In practice, many DIY crews opt for a single belt type for most jobs and keep a spare belt for quick changes where needed. This minimizes downtime and keeps projects on track while you refine technique. Remember to inspect belts for glazing, frayed edges, or glazing, and replace or rotate belts as you notice a loss of efficiency or an increase in finish defects. Belt selection is a core component of the belt sander comparison and someone’s successful outcome will hinge on it.
Power, Torque, and Variable Speed: Why It Matters
Power alone does not guarantee a perfect finish; torque stability and controlled belt speed are what prevent uneven removal and heat buildup. Belt sander models with a wide speed range allow you to tune the abrasive action to the wood type you’re working with. In practice, softwoods tolerate lower speeds that minimize tear-out, while hardwoods respond better to higher speeds for quicker removal without scorching the surface. The variable speed control, when present, should feel smooth without abrupt jumps in performance, as this helps sustain consistent contact pressure. Torque affects how well the belt maintains traction across the wood’s grain, especially when starting or negotiating grain changes. If your model has a fixed speed, you’ll need to modify technique to compensate for the lack of control, such as using lighter passes and broader strokes. In sum, you’ll want a sander with a reliable power band and a control system that lets you adapt on the fly, rather than forcing you to guess at the right setting.
Another important factor is the sander’s traction across the surface. A belt that tends to slip or track away from a straight line can cause guide marks or gouges, particularly on floors, where you’re trying to create an even plane. Models with better belt tracking mechanisms—often a small wheel alignment system—tend to produce more predictable results. The combination of power, speed range, and Belt tracking stability ultimately defines how “forgiving” a belt sander is for beginners and how quickly a skilled user can complete a project. In the belt sander comparison, Alpha’s power with a broad speed range and precise tracking gives the most versatile performance, while Bravo’s higher torque at moderate speeds suits aggressive removal, and Charlie’s mid-range approach helps users who value balance over extreme performance.
Dust Management and Vacuum Compatibility for Belt Sanders
Dust control is one of the most practical considerations for indoor sanding projects. The best belt sander for DIY tasks is the one you can work with for hours without inhaling or needing to stop to clean up. In the models examined here, dust management varies from integrated vacuum ports to bag-based dust collection and, in some cases, minimal or no onboard filtration. A durable dust port that fits a standard vacuum hose can dramatically improve visibility, reduce airborne dust, and extend belt life by reducing clogging and heat buildup. When evaluating dust collection, consider the hole pattern, the suction path, and the ability to seal gaps around the workpiece to minimize escape routes for dust. You’ll also want to verify that any vacuum port aligns with your existing vacuum hose diameter, so you don’t end up using adapter sleeves that reduce suction.
In practice, a good dust system can be the difference between a quick project and a long cleanup afterward. If you’re sanding indoors, pair your sander with a shop vacuum or a dedicated dust extractor and run the vacuum during the operation to manage dust more effectively. If your chosen model lacks an integrated system, invest in a quality dust bag, regularly replace it, and consider a secondary filtration approach to keep your air clean. The belt sander comparison emphasizes that dust control is not an afterthought but a major factor in overall usability and end results.
Practical Use Cases: Floors, Decks, and Walls
The practical utility of a belt sander stems from how well it handles floors, decks, and walls—the three most common DIY target surfaces. For flooring, you want a sander with good belt tracking and enough power to remove finish layers evenly without creating dips or hollow spots. Alpha’s higher power and reliable tracking shine in this scenario, enabling even material removal across broad expanse areas with fewer pass repetitions. For decks, the balance shifts toward durability and aggressiveness; Bravo’s strength lies in removing old finishes and smoothing rough timber quickly, albeit with a need for careful edge work and feathering near boards. For walls, you’ll prioritize flatness and control, where Charlie’s mid-range performance and moderate weight help you work without leaving deep gouges or scalloped lines.
In all cases, technique matters as much as equipment. Maintain consistent contact pressure, move the sander in a straight, even motion, and avoid tilting or deflecting the tool. Before you start, do a test pass on a scrap piece or an inconspicuous area to verify that your belt and grit choices produce the finish you want. As you progress, you’ll adapt your approach depending on wood type, grain orientation, and surface irregularities. This practical guidance reflects how the belt sander comparison translates specs into real-world performance for homeowners and DIY enthusiasts.
Price, Durability, and Long-Term Value: A Truthful View
Budgeting for a belt sander is a balance between initial cost and long-term durability. Higher-priced models often offer more robust construction, better belt tracking, and longer belt life, which translates into fewer belt replacements and faster project completion. Yet price alone does not guarantee value; you must consider how frequently you’ll use the sander, the kinds of projects you typically tackle, and the maintenance you’re willing to perform. From a DIY perspective, Alpha often wins on a per-project basis due to its blend of power, control, and robust tracking, which reduces the need for reworks. Bravo may deliver better value if you regularly encounter heavy stock removal and can handle the trade-offs of added weight. Charlie’s mid-range positioning makes it a solid choice for users seeking versatility without paying a premium for specialized features.
In the long run, you should expect to replace belts periodically and perform basic maintenance to preserve performance. The belt sander comparison emphasizes that value is not just about the sticker price but the practical outcomes you achieve—fewer mistakes, faster completion times, and a finish that looks as good as you planned. SanderSavvy’s analysis suggests that the best choice aligns with your typical workload and your willingness to invest in a modular setup of accessories and belts.
How to Read a Belt Sander Spec Sheet: Common Pitfalls
Spec sheets can be a maze of acronyms and numbers that don’t translate directly to performance. A smart reader translates rpm ranges, belt width, and power into practical outcomes. First, confirm belt width (most common is 3 in) and length (often 18 in). Second, read the rpm range and understand its relationship to hardness and finish quality; higher rpm is not always better for delicate woods. Third, note the weight and balance because heavier tools can cause fatigue and reduce control over long sessions. Fourth, check for a documented dust port diameter and compatibility with typical vacuum systems. Lastly, verify warranty terms and service availability, since this can affect long-term reliability. The belt sander comparison shows that a model with a smooth, predictable speed range and a robust belt-tracking mechanism tends to perform consistently across different wood species and surface conditions.
When in doubt, compare two or three models side by side using the same grit sequence and test material. This practical approach reduces the influence of marketing claims and helps you see how the sander behaves in a real project. The model you choose should align with the most common tasks you’ll perform, be forgiving of minor mistakes, and produce a finish you can live with—especially for floors and decks where any flaws are highly visible.
Maintenance, Belt Changes, and Common Issues
Maintenance is the small difference that keeps a belt sander performing well over years. Regularly inspect belts for glazing, tears, or glazing that reduces cutting efficiency. Clean the base plate and vents to prevent heat buildup. When changing belts, disconnect power, release belt tension, and ensure the new belt is aligned with the arrows and tracks true before turning the sander back on. For dust management, inspect the vacuum port and replace or empty bags as needed to avoid clogging, which can reduce suction and increase dust rollback. Common issues—wandering tracking, belt slippage, and wheel wear—are frequently caused by improper belt installation, misalignment, or debris trapped in the drive system. Routine lubrication and periodic checks on the tracking adjustment can mitigate these problems and extend the tool’s life.
If you encounter persistent problems, consult the manufacturer’s guidelines for belt replacement intervals, torque specifications, and safe operation limits. In a belt sander comparison, the best models combine durable construction with straightforward maintenance routines, reducing downtime and ensuring consistent results project after project.
Getting the Right Belt and Accessory Setup: A Quick Checklist
Choose belts with compatible width and length for your model. Verify grit range for your task: rough removal often uses 40-60 grit; intermediate steps use 80-120 grit; finishing uses 180-240 grit. Consider ceramic belts for heavy removal and aluminum oxide for smooth, predictable finishing. Ensure you have a reliable dust extraction setup that matches the vacuum port diameter. Keep spare belts of the same grit on hand to minimize downtime. For a balanced workflow, invest in a small scraper or sanding block to join the belt changes with edge work or delicate corners. Finally, maintain a routine—dust control, belt inspection, and track alignment—to sustain performance over years of use.
Real-World Scenarios: 3 Sample Projects and Which Belt Sander Wins
Scenario 1: Refinishing a 350 sq ft oak floor with old varnish. Alpha’s power and tracking minimize pass count and reduce heat buildup, providing an efficient finish across wide boards. Scenario 2: Restoring a cedar deck with heavy weathering and deep grain. Bravo’s aggressive stock removal accelerates the process, but you’ll need precise edging and feathering near planks to avoid gouges. Scenario 3: Sanding drywall joints and plaster walls in a workshop project. Charlie’s mid-range performance offers enough control for gentle material removal while still being capable on small patches. These examples illustrate how the belt sander comparison translates into real-world results and how choosing the right model aligns with your specific project mix.
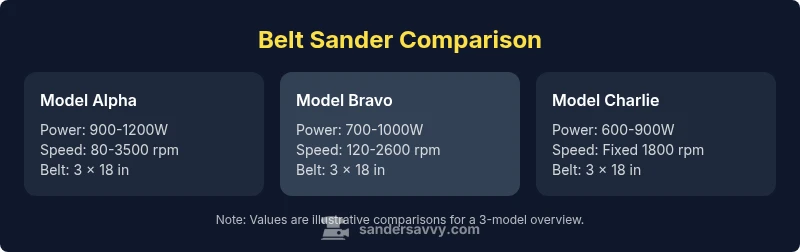
Feature Comparison
| Feature | Model Alpha Belt Sander | Model Bravo Belt Sander | Model Charlie Belt Sander |
|---|---|---|---|
| Power (W) | 900-1200 | 700-1000 | 600-900 |
| Belt width | 3 in | 3 in | 3 in |
| Variable speed | Yes (80-3500 rpm) | Yes (120-2600 rpm) | No (fixed 1800 rpm) |
| Dust collection | Integrated vacuum port | Dust bag | No dust port |
| Weight (lbs) | 7.5 | 9.0 | 6.8 |
| Best for | Beginner-friendly tasks | Heavy material removal | Versatile mid-ground tasks |
What's Good
- Balanced power-to-weight for beginners
- Reliable belt tracking with minimal wandering
- Effective dust collection when paired with a vacuum
- Flexible speeds for gentle finishing and aggressive stock removal
- Clear price-to-performance value for DIY floors and decks
Weaknesses
- Higher-end models can be heavier
- Belt changes can interrupt workflow
- Some models have limited warranty coverage
- Noise levels can be high in tight spaces
Alpha is the most versatile overall; Bravo excels at heavy stock removal; Charlie fills the gap for mid-range needs.
For most DIY projects, choose Alpha for balance; Bravo when you need removal power; Charlie for mid-range versatility. The right choice depends on your typical tasks and budget.
Your Questions Answered
What is a belt sander best used for?
Belt sanders excel at rapid material removal on flat surfaces like floors and large decks. They’re less maneuverable near edges or corners, so use light passes and check for gouges. Pair with a vacuum to manage dust.
Belt sanders are great for quickly removing material on flat areas; use light passes near edges.
What size belt should I choose for a DIY project?
Most DIY projects use the standard 3-inch belt for balance between removal and control. If you need faster stock removal on large surfaces, a wider belt may help, but it can be harder to control.
Most DIY projects use a 3-inch belt; wider belts remove more but are harder to control.
Do belt sanders require dust collection?
Yes, using a vacuum improves visibility, reduces airborne dust, and prolongs belt life. Look for a model with a dust port that fits your vacuum hose.
Dust collection is highly recommended for clean, safe sanding.
Can belt sanders be used on decks?
Yes, for smooth, flat deck surfaces. Use slow speeds and light passes to avoid gouging. Check belt type and wear to handle outdoor conditions.
They can be used on decks with care; go slow and keep it flat.
Are belts universal across brands?
No—belts are generally not universal. Always verify belt size (width and length) and material with your specific model.
Belts aren’t universal; check your model’s size.
How do you change sanding belts?
Switch off and unplug the sander. Release the tension, remove the old belt, fit a new one with the arrows aligned, and re-tension. Test on scrap material first.
Power off, release tension, swap belt, re-tension, and test.
Main Points
- Prioritize power and weight balance for comfortable long sessions
- Consider dust control capacity when working without external vacuums
- Match belt width and speed to your specific tasks for best results
- Use the recommendation chart to pick one that fits your budget and project scope