Sander and Vacuum: A Dust-Smart Sanding Guide for DIYers
Explore how to pair a sander with a vacuum for cleaner dust control, better finishes, and faster projects. This comparison covers integrated vs. external dust collection and practical setup tips for DIY floors, decks, and walls.

Pairing a sander with a dust-collection vacuum dramatically improves dust control and finish quality. Capture particles at the source, reduce cleanup, and protect indoor air. See our full comparison chart for the best vacuum-sander combos.
Why a sander and vacuum work together
According to SanderSavvy, the combination of a sander and vacuum is more than a convenience; it is a core safety and quality decision for any DIY project involving floors, decks, or walls. Airborne dust from sanding can irritate eyes and lungs and settle into crevices, grain, and coatings, compromising the final finish. A vacuum helps capture dust at the source, reducing exposure for you and your family while keeping work surfaces clean enough to inspect stain absorption and finish uniformity. When you pair a sander with a vacuum, you gain smoother finishes because the dust does not sit on the surface to be abraded away or mixed into coatings. The key is selecting a setup that fits your sanding tool, the material you’re working with, and the space you’re in. In this guide you’ll learn how to evaluate options, connect ports, and optimize airflow for sander and vacuum harmony.
- The central idea is to capture particles as they are created, not after they fall.
- For best results, prioritize sealed canisters or HEPA filtration inside your dust collector.
- Start with a simple, compatible pairing and scale up as projects grow in size or complexity.
How dust collection actually happens
Dust collection is a flow problem: air, dust, and particulates are drawn through the sander’s dust port and into the attached vacuum or dust collection system. A well-designed system maintains steady airflow, so the negative pressure at the sanding surface remains consistent. In practice, you’ll want a dust port that matches your sander’s exhaust and a hose that won’t collapse under suction. When the vacuum draws air through the sanding surface efficiently, you minimize lofting of fine particles into the room and reduce the likelihood that dust lands on wet coatings, which can ruin adhesion. The physics is straightforward: better suction at the point of contact equals less airborne dust and cleaner edges.
- Keep hoses straight and avoid sharp bends that choke airflow.
- Use a tight seal at connections to prevent air leaks.
- A secondary cyclone or HEPA filter improves dust capture without overworking the motor.
Choosing the right vacuum for sanding
A sander and vacuum pairing hinges on selecting a vacuum with appropriate filtration and port options. Start with a shop vacuum or portable dust extractor that offers a sealed canister and a robust filter system. Look for models that advertise fine dust filtration and a secure hose connection. If possible, choose a unit with a dedicated dust-separation feature or cyclone technology to keep the filter from clogging quickly. The vacuum should feel balanced when attached to the sander and not cause the tool to tip or vibrate excessively. Size and noise are also practical considerations: a compact unit is easier to maneuver in tight spaces, while a larger unit might sustain consistent suction during longer sessions. Finally, verify compatibility with your sander’s dust port, or plan to use adapters that provide a snug, secure fit.
- Favor vacuums with HEPA or equivalent filtration for dusty materials.
- Favor models with durable hoses and corrosion-resistant components.
- Consider a tool with an integrated dust port if you want the simplest setup.
Connecting a vacuum to your sander
Connecting a vacuum to a sander is a straightforward task once you know the port sizes and available adapters. Start by checking the sander’s dust port diameter and matching it to the vacuum hose. If the port and hose don’t line up, you’ll need a reliable adapter that maintains a tight seal without leaking air. Attach the hose securely, then test airflow by lightly pressing the nozzle to a scrap piece of material. You should see dust being drawn toward the vacuum with minimal backflow. For floors, decks, and walls, maintain a short, direct hose path to minimize air loss. Avoid long, tangled hoses that bend and kink, which reduces suction. If your sander doesn’t have a built-in port, you can retrofit with a universal dust collection adapter. Remember to power the vacuum before you start sanding and switch to a dedicated reduce-noise setting if available to maintain a comfortable work environment.
- Use adapters that preserve a tight seal.
- Keep the hose off the sanding surface to avoid snagging.
- Periodically check for clogs and clean the canister.
Sander types and their dust compatibility
Sander design affects how well dust is contained. Random-orbit and orbital sanders commonly include a dust port and accept external hoses, making them a natural fit for vacuum-assisted dust control. Belt sanders, while more aggressive, often rely on separate dust extraction strategies and may require larger hoses or external dust collectors to achieve comparable capture. When you pair these tools with a vacuum, ensure the port interface is stable and that the port diameter matches the hose. For walls and ceilings, consider a palm sander or detail sander with a snug dust port so you don’t lose control or create noise from the suction.
- Random-orbit sanders excel for finishing with dust control.
- Belt sanders demand robust extraction to handle heavier dust loads.
- For delicate surfaces, a detail sander with a tight port minimizes blow-off and produces cleaner edges.
Sander and vacuum synergy in practice
In real-world projects, the best practice is to align your sander and vacuum setup with the job’s demands. For a typical floor refinish, a random-orbit sander with a ducted vacuum can maintain a uniform finish and substantially reduce cleanup. On decks, a belt sander might require a larger dust port and a vacuum with higher airflow to keep particulates from sneaking into wood pores. For walls or ceilings, a palm or detail sander coupled with a tight-fitting vacuum hose allows you to manage fine dust near joints and trim. The key is consistency: keep the dust path short, secure, and free of kinks, and check the filter regularly.
- For long sessions, consider a larger capacity vacuum to avoid frequent emptying.
- When switching surfaces, verify the port compatibility again and adjust hoses as needed.
- Always maintain a clean workspace, as accumulated dust can sabotage coating adhesion and finish quality.
Workflow for floors, decks, and walls
A practical sanding workflow with a sander and vacuum starts with surface preparation and dust containment planning. For floors, begin with a coarser grit to level high spots, then progress to finer grits while keeping the vacuum running. On decks, clean and dry the surface first to prevent dust from clumping; use light, even strokes to avoid gouges, and maintain consistent suction to capture airborne dust. For walls and ceilings, plan for tight-edged cuts along trim lines and corners, using a lighter touch to avoid chipping. In all cases, frequently inspect the finish as you go; dust-free surfaces absorb stain and sealants more consistently, yielding an even appearance. Documenting the dust collection strategy during each step helps you reproduce success on future projects.
- Maintain steady hand pressure to avoid launching dust into air.
- Use slower, controlled passes for better edge control and less airborne dust.
- Periodically run the vacuum during long passes to prevent clogging.
Safety, ventilation, and PPE
Dust control is a safety issue as much as a finishing issue. Even with a vacuum, sanding creates fine particles that can irritate eyes, lungs, and skin. Wear a well-fitted respirator rated for nuisance dust or fine particulates, along with eye protection and hearing protection. Work in a well-ventilated area or use additional local exhaust to manage volatile coatings. Avoid lean ventilation into closed spaces and reduce exposure by using airtight containment when feasible. Remember, the goal is to minimize dust generation and capture what is created in real time. If you exhaust to the outdoors, ensure that this does not create a dust nuisance for neighbors.
- Fit PPE that matches the project’s dust level.
- Keep coatings and finishes away from sources of ignition when sanding near flammable products.
- Schedule breaks to ventilate the space and prevent fatigue.
Maintenance, cleaning, and troubleshooting the dust system
Keeping your sander and vacuum in peak condition requires a simple maintenance routine. Regularly empty the vacuum canister, inspect hoses for cracks, and clean the dust port to prevent buildup. Replace worn gaskets and inspect adapters for wear. If you notice reduced suction, check for clogs in hoses or filters and replace a filter if necessary. For more complex setups, test airflow with a scrap test to confirm that dust is being captured effectively. Troubleshooting often reveals that the simplest fixes—tight seals and clean ports—deliver the biggest gains in suction and finish quality. Document your configuration so you can reproduce it later.
- Schedule periodic filter checks during long jobs.
- Keep a spare set of adapters and hoses on hand.
- Record your preferred configurations for future projects.
Cost, value, and deciding when to upgrade
Investing in a sander and vacuum system pays off in cleaner workspaces, faster cleanup, and better coat adhesion. The value increases when you frequently sand large areas or work in projects with strict ventilation requirements. If you’re a homeowner tackling occasional projects, a compact vacuum with a solid dust filter and a compatible sander is often sufficient. For pros or heavy-duty jobs, a larger vacuum system with cyclone separation and robust filtration can sustain longer sessions without overheating or clogging. The decision to upgrade should consider space constraints, noise tolerances, and the types of finishes you plan to apply. SanderSavvy recommends prioritizing compatibility, filter quality, and seal integrity as the top three upgrade criteria.
- Prioritize compatible dust ports and reliable filtration.
- Consider space usage and noise when selecting equipment.
- Revisit your setup after a few projects to refine the workflow.
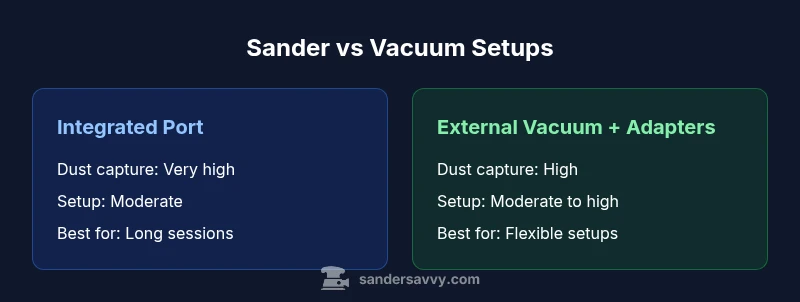
Feature Comparison
| Feature | Sander with integrated vacuum port | Sander with external vacuum via adapters | No vacuum dust control |
|---|---|---|---|
| Dust capture efficiency | Very high with integrated port | High with adapters | Low |
| Air quality impact | Excellent | Good | Poor |
| Finish consistency impact | Very good | Good | Variable |
| Setup complexity | Moderate | Moderate to high | Low |
| Maintenance needs | Low to moderate | Moderate | Low |
| Best for | Pro setups and long sessions | Residential DIY with some prep | Minimalist, budget-friendly |
What's Good
- Drastically reduces airborne dust and clean-up time
- Improves coating adhesion by maintaining a dust-free surface
- Streamlines workflows and protects indoor air quality
- Can shorten project duration by reducing dust-related slowdowns
Weaknesses
- Higher upfront cost for proper dust-collection hardware
- May require adapters or port modifications for compatibility
- Not all sanders have built-in ports, limiting setups
- hose management becomes important to avoid interference with sanding
Integrated dust control is the clearer winner for most projects
A sander and vacuum pairing delivers cleaner air and better finishes in most DIY scenarios. For larger or longer jobs, the integrated port setup minimizes workflow disruptions; for smaller tasks, a compatible vacuum with adapters can still yield strong results. The SanderSavvy team recommends prioritizing compatibility and filtration first, then considering system scale as needed.
Your Questions Answered
What is the best vacuum for sanding?
A shop vacuum or portable dust extractor with good filtration (HEPA or equivalent) is typically the best balance of performance and cost for sanding. Ensure the unit has a reliable dust port and hoses that fit your sander. Compatibility and seal quality are more important than brand name.
A HEPA-filtered shop vac with the right dust port adapters is usually your best bet for sanding.
Can I sand without a vacuum?
You can, but you’ll generate substantially more dust and cleanup time. Use a respirator, wear eye protection, and contain dust as much as possible if you choose to work without a vacuum. For best results, use dust control whenever possible.
Sanding without a vacuum will create a lot of dust; use PPE and contain dust when you can.
How do I attach a vacuum to an orbital sander?
Use a dust port adapter that fits both the sander and your vacuum hose. Some sanders have built-in ports; others require adapters. Ensure a tight seal and minimize hose length to maintain suction.
Attach via a matching dust port or adapter and test airflow before sanding.
Are all vacuums compatible with sanding tools?
Most vacuums work with sanding tools if you have the right hose and adapter. Check port diameters and ensure the hose doesn’t leak air. Some setups may require a dedicated dust extractor for best results.
Most vacuums work with sanding tools with the right adapters.
What safety gear should I use with sanding and dust collection?
Wear a resistant respirator appropriate for dust, eye protection, hearing protection, and breathable clothing. Avoid loose clothing near moving parts and keep the workspace ventilated.
Wear a proper respirator, goggles, and hearing protection for sanding dust.
How does dust collection affect finish quality?
Dust can embed into coatings and ruin adhesion, pull uniformity, and create texture. Effective dust collection helps coatings dry evenly and improves overall finish quality.
Dust collection keeps finishes even and adhesion solid.
Main Points
- Prioritize compatible sander-vacuum setups for dust control
- Keep hoses short, seals tight, and ports clean for best suction
- Choose HEPA-filtration vacuums when possible
- Test airflow before starting a long sanding pass
- Adapt the setup to floors, decks, and walls for consistent results