Liquid Sander vs Sanding: A Practical Comparison
Explore liquid sander vs sanding: compare effectiveness, dust, finish quality, labor, and safety to decide the best approach for wood floors, decks, and walls. Practical guidance from SanderSavvy helps homeowners choose wisely.

Liquid sander vs sanding presents two main paths for surface preparation. Liquid alternatives can soften finishes and reduce manual scraping, while traditional sanding removes material with abrasive pressure. Each method creates dust differently, impacts finish quality, and changes time and labor. This quick answer outlines the core trade-offs in finish consistency, safety precautions, and cost, so homeowners can choose the best approach for wood floors, decks, or walls.
What Liquid Sander Is (and How It Differs from Traditional Sanding)
In practical terms, a liquid sander is a chemical formulation applied to a coated surface to soften, swell, or loosen the existing finish so it can be removed or abraded more easily. This approach can simplify prep work on certain coatings and substrates, potentially reducing physical labor. According to SanderSavvy, the decision to use a liquid sander depends heavily on the coating history, substrate stability, and the desired final texture. For homeowners exploring liquid sander vs sanding, the key question is whether the surface is compatible with the product and whether the resulting texture will meet the project goals. Remember that even with a liquid approach, proper ventilation, PPE, and adherence to product instructions are essential. This discussion also considers how liquid sander formulations interact with common wood species, finishes, and adhesives encountered on floors, decks, and walls.
How Traditional Sanding Works and Why It Remains Popular
Traditional sanding relies on abrasive materials and power tools to physically remove finish and wood layers. Grit choice, pressure, and tool type influence the final texture and surface flatness. Compared with liquid sander vs sanding, traditional sanding offers precise control over material removal and is often preferred when removing thick coatings, leveling profiles, or preparing a very smooth substrate for finishing. The method requires dust management, noise considerations, and consistent technique to avoid gouges or burn marks. Users should understand abrasive type (sandpaper, discs, belts) and how tool ergonomics affect cutting efficiency, especially on large areas like floor panels or deck surfaces. A careful balance between speed and control is central to achieving a professional result with sanding.
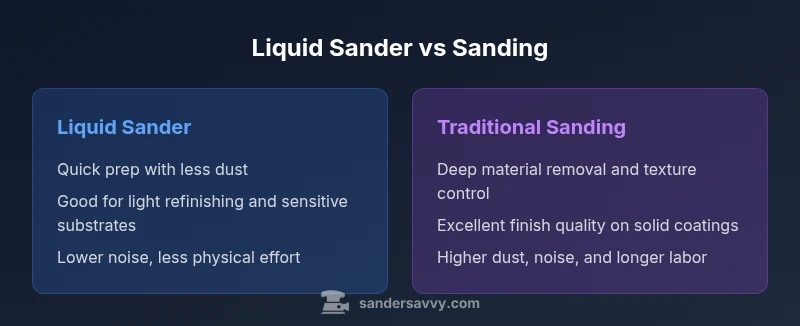
The Core Differences: Finish Quality, Dust, and Time
When weighing liquid sander vs sanding, finish quality is a top factor. Liquid formulations may leave a slicker surface or alter grain raising, depending on the product and the coating. Sanding can produce a more uniform thin layer removal and better control over grain raise, particularly on hardwoods. Dust generation is another major distinction: sanding creates a visible dust plume that requires containment and filtration, while liquid sander usage produces less airborne dust at the source but yields residue that must be cleaned up and disposed of properly. Time to prepare, perform, and recoat can shift in favor of liquid sander methods for lighter refinishing tasks, yet deeper coatings often demand traditional sanding for predictable results. For many projects, the best choice depends on coating thickness, substrate sensitivity, and the final finish you intend to achieve.
Surface Compatibility: Wood Types, Coatings, and Substrates
Not all surfaces respond the same to liquid sander vs sanding. On softwoods or older woods with delicate grain, chemical softening can risk swelling or texture changes if not carefully controlled. On hardwoods with polyurethane or varnish coats, preliminary tests on scrap sections help determine whether a liquid product will feather or remove with the desired ease. Porous substrates may absorb liquids differently, affecting stain acceptance and finish uniformity. Decks exposed to weather can react variably to liquids, so a trial area is essential. Walls with old latex or oil-based paints will also react differently under liquid formulations compared with sanding. In short, surface type and finish history should drive the decision more than any generic rule.
Dust and Safety Considerations: PPE, Ventilation, Containment
Dust control and safety are central to any sanding decision, and the liquid sander vs sanding comparison frames this around risk management. Liquid products generally reduce airborne dust during the active phase, but residues and solvents introduce their own safety considerations, including ventilation and potential chemical odors. Read product labels for ventilation guidance and flammability warnings, and use appropriate PPE such as gloves, goggles, and respirators when working with chemical formulations. At the same time, traditional sanding creates significant dust and fine particulates that demand dust collection systems, sealed containment, and rigorous cleanup. A properly prepared workspace reduces exposure to wood dust and chemical vapors, protecting both occupants and finish integrity.
Finish Quality and Texture: What to Expect from Each Method
When comparing liquid sander vs sanding in terms of finish, the trade-off is between process ease and texture predictability. Liquid approaches can simplify coating softening and removal but may require careful reapplication or retreatment to avoid surface gloss variation. Sanding affords precise texture control, allowing even removal and a uniform grain response, which is especially important for long-running floors or veneer surfaces. The final appearance depends on surface preparation, subsequent stain or sealer, and the number of steps used to achieve the desired look. Expect that, in some cases, a light initial pass with liquid treatment followed by a careful sanding pass yields the best outcome. The SanderSavvy team emphasizes testing on a small area to confirm compatibility and finish alignment before committing to the entire project.
Efficiency and Labor: Time Investment and Hands-On Work
Efficiency is a major differentiator in liquid sander vs sanding decisions. Liquid formulations can reduce hand-sanding time on simple refinishes and are especially helpful when you need to pre-soften a finish to minimize scraping. However, some jobs may require multiple applications, neutralizing steps, and subsequent re-sanding to achieve consistent texture. Traditional sanding, while more labor-intensive, provides direct control over removal rate and surface flatness, reducing the risk of over-sanding or uneven grain when done by a skilled operator. Homeowners should weigh the cumulative effort, tool wear, and waiting times for each approach, especially on large areas like floors and decks. The ongoing balance of time preservation and surface quality will guide the best choice for the project scale and finish goals.
Cost and Availability: Liquids, Abrasives, and Equipment
Cost considerations for liquid sander vs sanding hinge on product line, coatings, and equipment used. Liquid products may carry per-use costs and consumables (pads, wipes, or neutralizers) that add up over a project. Sanding can involve plies of sandpaper, sanding discs, belts, and the need for power tools; these items are often reusable but require replacements over time. Availability varies by region and supplier, so it helps to compare local stock and shipping times for both approaches. For a comprehensive assessment, homeowners should estimate total material costs, including safety gear and cleanup supplies, and factor in potential time savings when choosing between liquid sander vs sanding.
How to Use Liquid Sander Safely and Effectively
Using a liquid sander safely starts with reading the label and performing a patch test. Apply the product to a small, inconspicuous area and observe a removal response before continuing. Work in a well-ventilated space and wear PPE, including gloves and eye protection. Apply and wait for the recommended dwell time, then wipe away residues with clean cloths, following up with compatible neutralizers if required. After removal, assess the surface for uniformity and grain raise. If the finish remains uneven, a light sanding pass or a new application may be necessary to achieve a consistent result. Always follow manufacturer instructions for surface compatibility and disposal guidelines.
How to Sand Effectively: Techniques for Even Results
When you choose traditional sanding, use a systematic approach to ensure even material removal and a smooth final surface. Start with coarse grit to remove coating quickly, then progress through medium and fine grits for finishing. Keep the sander moving to avoid gouges and maintain consistent pressure. For flat surfaces like floors, use long, even strokes and cross-hatch patterns for uniform texture. Pay attention to grain direction to minimize raised fibers and optimize stain absorption. Inspect the surface frequently for irregularities and adjust grit progression as needed to achieve a flawless end result.
Decision Guidelines: When to Choose Each Method
Choosing between liquid sander vs sanding depends on project goals, coating history, and tolerance for dust. If you need faster prep with less dust and the coating is compatible with the solvent system, a liquid sander may be ideal for light refinishing. For heavy coatings, deep material removal, or intricate profiles, traditional sanding usually delivers the most reliable finish quality and predictability. In borderline cases, consider a hybrid approach: apply a liquid sander to loosen finishes on select areas, then complete the job with careful sanding to even the surface texture. SanderSavvy emphasizes testing on a scrap area before committing to the entire project.
Maintenance, Cleanup, and Reapplication: Aftercare for Each Method
Cleanup after using either method should be thorough and methodical. For liquid sander use, wipe residues, ventilate the space, and properly dispose of used materials per local regulations. After sanding, collect dust with a vacuum, wipe surfaces, and inspect for fiber raised areas that may need touch-up. Reapplication steps vary by finish; many projects require a light intermediate sanding between coats to ensure adhesion and uniform color. Take care to reseal the work area and store materials safely to prevent spills or chemical exposure. This disciplined approach helps ensure that the chosen method yields a durable, aesthetically pleasing result.
Comparison
| Feature | Liquid Sander | Traditional Sanding |
|---|---|---|
| Dust and mess | Less airborne dust during active phase; residues need cleanup | Generates noticeable dust; requires containment and dust collection |
| Finish control | Good for light refinishing and softening coatings; texture can vary | Excellent control over texture and depth of removal |
| Surface impact | Potential texture changes on certain coatings; testing essential | Deeper, more predictable surface leveling with careful technique |
| Time to complete | Can shorten prep on light tasks, depending on coating history | Often longer due to material removal and dust cleanup |
| Cost framework | Per-use chemical costs plus disposables; variable by product | Cost includes abrasives, discs, belts, and tool maintenance |
| Best for | Light refinishing, delicate substrates, and fast turnaround | Heavy coatings, solid woods, and profiles requiring precision |
What's Good
- Potentially faster prep on light coatings
- Less airborne dust during active work
- Lower vibration and noise compared to aggressive sanding
- Good for subtle refinishing on sensitive substrates
Weaknesses
- May alter texture or grain raise if not tested
- Chemical exposure and ventilation requirements
- Not ideal for thick coatings or heavy material removal
- Ongoing consumable costs and disposal considerations
Liquid sander is preferred for light refinishing and dust-sensitive spaces; traditional sanding wins for heavy coatings and precise finish control
If the project involves light refinishing on delicate surfaces, liquid sander often saves time and reduces dust. For thick coatings or complete texture control, traditional sanding remains the safer choice. The SanderSavvy team recommends testing both approaches on scrap to determine the best fit.
Your Questions Answered
What is liquid sander, and how does it differ from sanding?
A liquid sander uses chemical agents to soften or loosen coatings for easier removal, whereas sanding relies on abrasives to physically remove material. Liquid formulations can reduce manual effort on light refinishing but may affect texture and grain. Sanding offers precise control for deeper removal and smoother finishes, especially on solid coatings.
Liquid sander uses chemistry to prep the surface, reducing scraping. Sanding uses abrasives for material removal and texture control.
Is dust safer with liquid sander than with sanding?
Liquid sander methods typically generate less airborne dust during the active phase, but you still contend with solvent vapors and surface residues. Sanding produces more dust altogether and requires careful containment and filtration. Proper PPE and ventilation are essential for both approaches.
Liquid sander may reduce dust during work, but it still needs ventilation and PPE.
Will liquid sander damage the wood?
Improper use can cause texture changes, grain raising, or uneven appearance. Always test on a small area and follow manufacturer instructions. If in doubt, combine a light liquid treatment with a controlled sanding pass to manage texture.
Test first, follow directions, and consider a mild approach on fragile wood.
What surfaces should I avoid with liquid sander?
Avoid soft, highly porous, or damaged substrates where chemical solvents might swell or distort the underlying material. Also, highly glossy finishes or certain varnishes may not respond predictably. Always test before proceeding on main areas.
Test on scrap areas first to gauge compatibility.
How do I clean up after using a liquid sander?
Ventilate the space and wipe residues with a recommended solvent or damp cloth as instructed by the product. Collect used rags in a safe container and dispose of chemicals per local regulations. Follow up with a dry surface inspection before continuing with finishing steps.
Ventilate, wipe residues, and dispose of used materials properly.
How do I decide between liquid sander and sanding?
Consider coating type, required final texture, time constraints, and tolerance for dust. For light refinishing on compatible coatings, liquid sander can save time. For heavy coatings or critical smoothness, traditional sanding is usually more reliable.
Think about coating, texture needs, and dust tolerance to decide.
Main Points
- Assess coating history and substrate before choosing
- Test on scrap areas to confirm finish response
- Prioritize dust control and ventilation for any method
- Consider a hybrid approach for complex projects