Orbital Sander vs Normal Sander: A Practical, Side-by-Side Guide
A detailed comparison of orbital sanders and traditional finishing sanders, covering motion, finish, dust control, edge access, maintenance, and buying tips for DIY wood projects.

Orbital sander vs normal sander: for most DIY projects involving floors, decks, and walls, the orbital sander offers better finish quality, dust control, and lighter vibration, making it the safer all-around choice. A traditional palm/finish sander can still outperform for heavy stock removal and tight corners. The best pick depends on your task, surface, and tolerance for swirl marks.
What is the orbital sander vs the normal sander?\n\nWhen homeowners and DIY enthusiasts ask about the orbital sander vs normal sander, they are usually contrasting two common tools used for smoothing wood surfaces. An orbital sander is defined by a round base that moves in small circular or elliptical orbits. The term "normal sander" in DIY parlance often refers to a palm or finishing sander with a flat, square, or rectangular pad and a linear motion. These motion patterns translate into different results on the workpiece. According to SanderSavvy, most beginners and intermediate woodworkers benefit from thinking in terms of task type rather than tool type. The orbital sander shines in finishing tasks where a smooth, even surface is the goal, while a conventional stiffener or palm sander can be advantageous for aggressive stock removal or when you need to walk a tool into tight corners. The key is to align the motion with the surface and the desired texture, not just with what you own. The orbital sander vs normal sander decision often boils down to finish quality, control, and dust management. If you are smoothing a cabinet door or the top surface of a floor panel, the orbital approach frequently yields fewer visible swirl marks and a more uniform sheen. For rough stock or edges, the normal sander can quickly reduce material height and prepare the surface for final smoothing. The SanderSavvy team emphasizes that choosing the right tool starts with defining your project stage: rough leveling, intermediate smoothing, or final finishing.\n
wordCountBlock1”:210},{
How orbital motion works and why it matters\n\nThe mechanical core of an orbital sander is its circular or elliptical motion, which creates a random-compatible orbit rather than a fixed back-and-forth swath. This motion reduces the likelihood of creating deliberate straight-line grooves or swirl patterns, provided you use light, even pressure and let the tool do the work. The pad travels in tiny circles while the abrasive disc or sheet spins along, producing a balanced cutting action that yields a consistent finish. In contrast, a traditional “normal” sander—often a palm or finishing sander with a square pad—uses a linear, vibrating, or near-stationary action. The result can be more aggressive material removal per pass and more visible scratch lines if the operator applies uneven pressure. For novices, the orbital motion is forgiving; it tolerates slight pressure variations and will still produce a near-uniform surface, especially on flat panels. The SanderSavvy analysis shows that the orbit’s geometry allows for better feathering at edges when paired with a high-quality dust collection system. In practice, the orbital sander is typically the most versatile choice for general smoothing tasks, while the traditional finish sander excels where rapid material removal is required or where you must reach shallow recessed areas with a smaller footprint.\n
wordCountBlock2”:225},{
Finishing vs stock removal: matching the task\n\nUnderstanding the orbital sander vs normal sander decision hinges on the intended outcome. Finishing tasks, such as smoothing a tabletop, cabinet doors, or a floor plank before applying a finish, benefit from the orbital sander’s delicate touch, reduced swirl, and cooler operation. The circular/elliptical motion minimizes the risk of gouging, especially on soft woods, and provides a more uniform scratch pattern that accepts stain or clear coats evenly. On the other hand, stock removal or leveling rough surfaces—think weathered deck boards, old varnish with many coats, or heavy material reduction—often demands a tool with higher aggressiveness. A traditional finish sander with a rectangular pad or a belt-driven design can remove more material per pass when paired with coarser grits and steady pressure. The choice becomes task-specific: the orbital sander for refinement, the normal sander for rapid material removal or tough edges. For most DIYers, starting with an orbital sander for smoothing and then switching to a palm sander for edging and corners yields a balanced workflow. The SanderSavvy team notes that planning your grit progression and tool order helps minimize rework and ensures a more consistent final appearance.\n
wordCountBlock3”:217},{
Edge access and maneuverability\n\nOne practical difference between orbital sander vs normal sander concerns edge work. Orbital sanders, with their round pads, excel on flat, open surfaces and can produce uniform results across large panels. However, reaching into tight corners and along flush edges is often easier with a traditional palm or finishing sander. The flat square pads of some normal sanders provide stable contact along edges and corners when guided with careful hand control. This is especially valuable on cabinet edges, door frames, or stair treads where a round sander may struggle to fit into narrow gaps. For curved surfaces, the orbital motion remains advantageous due to consistent contact across a broader contact area, but you still may need to switch to a narrower, more maneuverable tool for absolute precision along the curves. The choice should reflect where youʻll do most of your work and which areas demand the most control. SanderSavvy highlights that having both tools in a single workshop expands capabilities: you can sequence an orbital sander for bulk smoothing and a finish sander for precise edge work.\n
wordCountBlock4”:210},{
Dust management and safety considerations\n\nDust control is a critical factor in the orbital sander vs normal sander debate. Orbital sanders often perform well with a top-mounted dust bag or, more commonly today, a connected vacuum system. The rounded head and efficient dust ejection pattern can help collect a significant portion of debris when used with a proper dust canister. Normal finish sanders also benefit from dust-collection attachments, but their dust paths and more aggressive initial contact can stir up more particles if the system isn’t properly sealed. Regardless of the tool, using a high-quality vacuum, a respirator or safety goggles, and hearing protection is essential for long sessions. It’s also advisable to change or clean the dust collection filter regularly to maintain peak suction and minimize clogging. In addition, maintain a clean work surface and avoid pressing down hard; let the sanding action do the work. The SanderSavvy R&D notes that dust control should be considered a core element of any sanding plan, not an afterthought. A well-planned dust management approach reduces cleanup time and improves air quality in the workspace.\n
wordCountBlock5”:210},{
Maintenance, wear, and longevity\n\nWhen comparing orbital sander vs normal sander, maintenance becomes a practical concern for long-term projects. Orbital sanders use replaceable abrasive discs or sheets secured to a round pad, with the potential for pad wear and bearing friction over time. Regularly cleaning the pad surface, inspecting the dust collection system, and replacing worn pads promptly can extend the tool’s life. Normal sander designs may rely on different pad configurations (square or rectangular) and may wear in the corners or edge regions where contact is concentrated. It is important to check for pad delamination, loose screws, and motor heat buildup after extended use. Practically, rotating between grits rather than staying on one grit too long helps prevent heat buildup and keeps the sanding lines consistent. The SanderSavvy team emphasizes that routine maintenance reduces performance dips and ensures you get the most from your investment.\n
wordCountBlock6”:208},{
Buying tips and practical guidance\n\nChoosing between orbital sander vs normal sander requires clear criteria. Start with the surface type: smooth, flat boards vs rough stock. For rough stock, you may opt for a normal sander with coarse grit to remove material quickly, then switch to an orbital sander for finishing passes. Consider the pad size, weight, and vibration. A larger orbital sander offers faster coverage but can be harder to control on tight spots. Evaluate dust-control features: integrated vacuums or high-quality dust bags improve air quality and cleanup speed. Power and motor speed matter more for removing stubborn finishes or heavy layers; for typical interior woodworking, a tool with 4-6 amps and a variable speed range around 8,000-12,000 OPM is common, but precise specs should align with the brand and project. Grit progression is crucial: start coarse for initial leveling and finish with fine grits to achieve a uniform surface ready for staining or sealing. The SanderSavvy guidance stresses that a well-chosen grit sequence, a comfortable grip, and a reliable dust-collection system together determine the overall success of the project.\n
wordCountBlock7”:214},{
Step-by-step workflow examples\n\nExample 1: Finishing a hardwood tabletop with an orbital sander. Begin with a coarse grit (e.g., 60-80) to flatten the surface, then progressively move through 100, 150, and finally 220 grit for a glass-smooth finish. Maintain light, even pressure and keep the sander moving to avoid scorch marks. After each grit, wipe the surface to reveal any remaining scratches and address them with the next finer grit. Example 2: Deck board preparation with a normal sander for heavy stock removal. Start with a coarse grit (40-60) to remove old finish and rough texture. Work along the grain, and avoid staying in one spot to prevent gouging. Move to a mid-range grit (80-120) to even out the surface, then transition to an orbital sander with 220 for final finishing. This two-tool workflow embodies the orbital sander vs normal sander decision: use the heavy removal capacity of a normal sander first, then refine with an orbital sander for a uniform outcome. The SanderSavvy advice is to plan your grit ladder ahead of time and keep a clean shop so that you don’t drag old scratches into your final pass.\n
wordCountBlock8”:226},{
Common mistakes and troubleshooting\n\nCommon missteps in the orbital sander vs normal sander comparison include over-pressing, which leads to gouges or heat damage; neglecting dust collection, which reduces visibility and can clog the pad; and skipping intermediate grits, which leaves visible scratches that show up after finishing. If you notice swirl marks, re-check light pressure and keep the tool moving with a consistent speed. If the dust collection seems weak, inspect the vacuum hose, ensure a tight seal at the connection, and clean or replace the pad if necessary. For difficult corners, swap to a normal sander with a narrow pad or corner attachment to achieve better contact. Finally, test new grits on a scrap piece to confirm the scratch pattern before committing to the actual workpiece. The SanderSavvy approach recommends a trial run on scrap material to calibrate technique and grit progression, reducing wasted time, dust, and effort.\n
wordCountBlock9”:210}],
comparisonTable
comparisonTable
prosCons
verdictBox
keyTakeaways
faqSection
mainTopicQuery
authoritySources
taxonomy
categorySlug
tagSlugs
Comparison
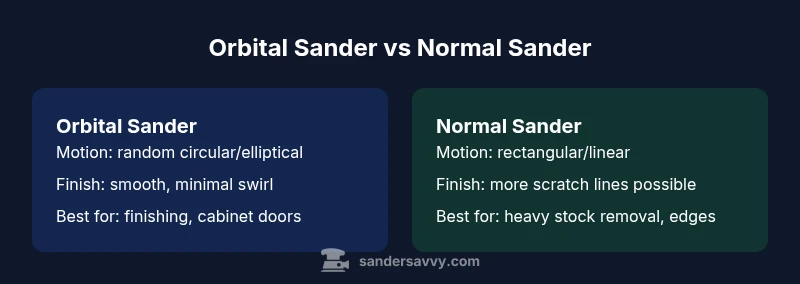
| Feature | Orbital sander | Finish sander (normal sander) |
|---|---|---|
| Motion pattern | Random circular/elliptical orbit | Rectangular or linear motion (palm/finish style) |
| Finish quality | Typically smoother, fewer swirl marks | Can show more noticeable scratch lines if pressure varies |
| Stock removal rate | Gentler on stock; best for finishing | Faster removal on rough stock and edges |
| Dust collection | Works well with vacuum systems | Depends on attachment; generally good with dust bags or vacuums |
| Edge access | Excellent on flat surfaces; corners can be trickier | Strong in edges and corners with rectangular pad |
| Best for | Smoothing, finishing, cabinet doors, floors | Initial leveling, heavy stock removal, edges |
What's Good
- Delivers a smoother finish with less visible swirl
- Lower risk of gouging due to orbiting motion
- Good compatibility with dust-collection systems
- Versatile for many wood types and surfaces
- Easier to control on large flat panels
Weaknesses
- Limited aggressive stock removal compared to heavy-duty tools
- Edges and corners may require a separate tool or attachment
- Can be slower on deeply rough stock if not paired with the right grit progression
- Requires more technique to avoid swirl when pressure is uneven
Orbital sander is the better all-around choice for most DIY finishing tasks
For most floors, decks, and furniture projects, the orbital sander delivers a superior surface finish with manageable dust and vibration. Reserve a normal sander for heavy stock removal and tight spots where aggressive material removal is needed.
Your Questions Answered
What is the main difference between an orbital sander and a normal sander?
The orbital sander uses a round pad that moves in random circular or elliptical orbits, delivering a smoother finish with fewer swirl marks. A normal sander (often palm or finishing) has a square/rectangular pad and a different motion, which can remove material more aggressively and reach corners more easily. The choice depends on the task and the desired surface texture.
Or, in short, orbital sanders are for finishing; normal sanders are for faster material removal and edges.
Is an orbital sander suitable for removing old varnish?
Yes, but you should start with a coarser grit to break the finish and then move to finer grits for a smooth final layer. The orbital motion helps control scratch patterns, but you may need a step-down process and possibly a more aggressive sander for stubborn spots.
Use coarse grit first, then fine for a smooth finish.
Can you use orbital sanders on curved surfaces?
Orbital sanders can work on curved surfaces, especially gently rounded profiles, but you may need to move slowly and rotate the tool to maintain consistent contact. For tight curves, a smaller or more flexible attachment may help maintain even abrasion.
Yes, but go slow and use appropriate attachments.
What grit should I start with for finish sanding?
Start with a medium grit (often around 120–150 for wood finishes) and then progress to finer grits (180–220) to achieve a smooth surface ready for stain or varnish. Always test on scrap first and adjust based on the wood type.
Test a scrap and move through grits to avoid scratches.
How do I maintain my sander for long life?
Regularly clean the pad and vents, replace worn sanding discs promptly, and inspect the motor and bearings for unusual noises or heat. Keep dust collection clean, and store the tool away from moisture. A well-maintained sander lasts longer and delivers consistent results.
Keep it clean, replace worn parts, and store properly.
Which is better for decks: orbital or normal sander?
For deck boards, a normal sander can be more effective for heavy stock removal on rough surfaces. An orbital sander is excellent for final smoothing after the heavy work is done, helping to produce a clean finish before sealing. A staged approach is common.
Do rough work with the heavy tool, finish with orbital.
Main Points
- Choose orbital for finishing and uniform texture
- Use a normal sander for rapid removal and edges
- Pair grits progressively to avoid scratches
- Maintain dust collection and light, even pressure
- Practice on scrap material before final passes